
For me the greatest beauty always lies in the greatest clarity. ~ Gotthold Epharaim Lessing
I was never really intending on doing a post on eyebrows: the do and don'ts, the how to's, and the what to use. However, lately at work (I am a sales representative in a mall) I have been noticing the things people do to their eyebrows. Now this is not just women its men too. To be honest there is only so much eyebrow fails that I can take that I thought it would be a good idea to do this post so that others out there do no make the same mistake. So lets get this started!
Little Lesson on Eyebrows:
Before you start doing anything to them take a while and look at your eyebrows. Some people are lucky enough to where all their eyebrows need is a little bit of a clean up and they are set and others, like myself, are not so lucky. The thickness of your eyebrows are pretty much determined on your facial features and yourself.
I would say to not do them any thicker than the Brooke Shields. (pic below)

And not any thinner than Gwen Stefani's eyebrows.

Tools To Shape Your Brows:
Some tools you may want to use or get to shape your eyebrows:
*Tweezers-to help pluck any unneeded hairs
*Mascara Wand- to have better control on your eyebrows
*Cosmetic Scissors-to cut any excess length
Beginning, Arch, and End:
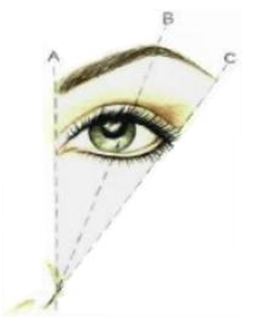
To determine where they should begin, end, and arch is a very simple task. For this you may want to grab a pencil and maybe an eyeliner as well. Using the pencil place it besides your nostril, like shown in the picture below marked as "A". This right here will determine where the eyebrow will begin. To help you you can use the eyeliner and make a mark at this point. Next you will place your pencil at about a 45º angle. It should be right on the corner of the pupil. This right here will be the highest point in your eyebrow, the arch ("B" in the picture). Once again feel free to make a mark as well. Finally "C". Align your pencil with the edge of your nose and the outer corner of your eye. This here will tell you where your eyebrow should end. Now with the end of your eyebrow ("C") make sure to not make it point downward. Keep this part high will give you a more awake and youthful look.
Like I had mentioned before you decide the thickness of your eyebrows. Do not make the space from the start of the eyebrow to the arch too thin. If anything all you have to do is clean up around the marks to give your eyebrows form.
After placing your marking use the mascara wand to put the hairs into place. Using the tweezers pluck away any hairs that are unwanted. Do a little at a time. If you have an issue with the small amount of pain it costs you can grab a cotton ball and soak it with water and apply the water on the area being plucked. This will with the pain. Now if you want to trim the length from your eyebrows take the wand and brush the hairs upwards. Anything that goes past your defined eyebrow cut. Do a little at a time and be very careful. Last thing you want is to end up with a bald spot on your eyebrow. I would recommend trimming your eyebrows when no one is around so you can avoid any distractions that may cause a little problem.
Defining the brows:
Now onto defining your eyebrows. If your brows are like mine you have certain areas in your brows that have a lot less hair than the rest of your brow. Defining and filling in the brow will not only give you a more complete look but give a little more focus to your face. Here are some of the tools you want to use for defining and filling in your brows.
*Eyebrow pencil or shadow-to fill in and define the brow
* Angled brush(for the shadow)-If using a shadow you want the angled brush to apply the shadow
*Brow Gel-Keep those brows in place
*Mascara Wand-Shape them into place. If you don't have one yet don't throw out the mascara wand from your empty mascara tube. Keep it and wash it. Its reusable :)
When filling in your brows you want to use the mascara wand to place them in shape. Next take your pencil or shadow and feather in the areas that are "bald". After feathering in those areas feel free to take your shadow or pencil and do a soft outline around your brows. If you feel that you made your brows a little too dark do not fuss. Take the wand and comb your brows out a little. This will help some of the color stick to the wand. If they are still too dark for you take a kabuki brush and brush your brows. Finally to keep them in place use the brow gel and do a coat over your brows. Its very easy to do and like I mention before makes your look be more complete and your eyes pop.
What NOT to do:

Chola brows: This is a big NO! For one they make her look angry all the time and they are too thin and dark.
Bushy and Uni brows: Not only is this unappealing but it does not accentuate her face at all.

Hockey brows: And yes I said hockey. Look that the shape. Its similar to the hockey stick. The arch is way to close to the beginning of the brow. They are way too thin for her face. They also make her look like she has a bigger forehead.

Another set of Chola Brows or Sharpie brows. They are way way too close together, uneven, too dark, and once again give the appearance of a big forehead.
Smiley Face Brows: If you look at the brows alone they look like the eyes from a smiley face. They are not only uneven, have no real shape, too dark, and one is higher than the other.

Sperm brows: These are just a type of brows that I would recommend no one to do. They seriously look like sperm.

Finally the tattooed brows. Whether its a design like the one about or tattooing actual looking eyebrows dont. You are going to regret any type of eyebrow tattooing when you are 60 and have sagging skin and the grandchildren ask you what you were thinking.
Anyways these are just a couple of suggestions on how to shape and fill in your brows. There are many great products out there and services to help you achieve this if you do not want to do it at home. I personally love to save money so I pluck my eyebrows nearly everyday to keep them clean and I also decided to invest in a wax warmer and supplies so I can also wax them at home. Hope you guys enjoyed this blog. :)

No comments:
Post a Comment