BLOGGER TEMPLATES AND TWITTER BACKGROUNDS

Wednesday, May 25, 2011

Super Mario One UP Nails!

"Imperfection is beauty, madness is genius and it's better to be absolutely ridiculous than absolutely boring."  ~Marilyn Monroe


So lately I have been super obsessed with Super Mario! I don't know why but I love that game so much I actually went out and bought a Nintendo (the original one. For those wondering why...well we own a X Box 360 and unfortunately they do not make Mario games for it...yet!).  Not to mention it was a steal because it was only $40 with all the cables, 2 controllers, the Super Mario game with Duck Hunt and of course the gun! Any who I decided that to match my passion for this awesome game and my ringtone, notification ringtone, cell wallpaper, and the "Nintendo Addict" T-shirt my husband bought me I would do something  similar for my nails! 
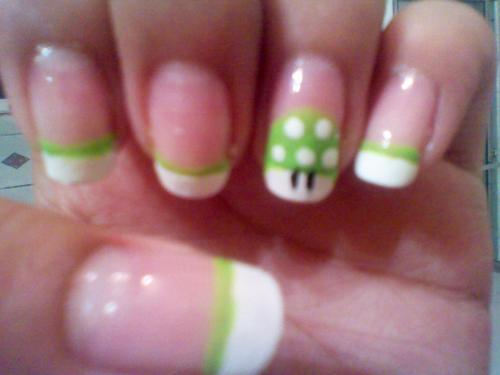
So here is the finished result! It took quite a bit of practice but the final result was amazing and they look super cute! Totally matching my Super Mario passion.  So lets get started on the supplies you need and how to achieve this simple and cute Mario nail look :) (as usual purchase location and prices  for the products I used will be posted at the end)

Supplies Needed:
  • Dotting tool(it can be a toothpick, bobby pin, or actual dotting tool)
  • Base Coat
  • White nail polish
  • Black nail polish
  • Green nail polish
  • Top Coat
  • If you do not have the black and green in the art pens or art polishes(the skinny tubes with super skinny brush) you may need a skinny art brush or a toothpick
  • Tape
  • Piece or cardboard or card stock (to put polish on so you can dip your dotting tool in)
Instructions:
First make sure your nails are squared off. This look works best on squared nails, but if you do not want to its ok, it will still work. For the first step you should appy a base coat. A base coat helps the nail polish adhere better, last longer, and keeps your nail from turning yellow. I personally like to use Sally Hansen Nailgrowth Miracle. I have used this since I was 16 and love how it keeps my nails strong and helps them grow a bit faster. Base coats tend to dry fast. I believe this one dries within seconds so its a good thing.

Once you have applied the base coat to your nails grab the tape and make 2 to 3 tape strips. The tape is going to allow you to make a nice sharp straight line for the french tip. You dont need 10 strips of tape since it is reusable and will it will save you tape too. I believe I used 1 piece of tape for 3 nails and it still would have worked for 3 more.

Once you put the tape on go in with the white fingernail polish and fill in the tip. I am using Sally Hansen, Hard as Nails French White Tip polish (this came in a 3 piece kit for french manicures).
Let it dry for a while and remove the tape carefully. You may need to free hand and fill in the corners or even out the line (I suck at straight lines with anything, yet I can cut straight lines in hair...its kind of funny!).

Repeat this step on every single nail. If needed take a q-tip and dip it in some nail polish remover and clean up the straight line.

Next step is for all the nails EXCEPT the ring finger on both hands. Using the green polish remover to create a straight thin line right underneath the end of the white tip. I used Kiss Nail Art Paint. If you do not have this but do have a green polish use the tip of a toothpick or a bobbypin to make this line. Just put a dot of product on the cardboard or card stock and dip your toothpick or bobbypin in and make the line. The final result should look like the picture at the very top of this post. For some reason my computer did not like the picture and wouldnt upload it...lol.

Now onto making the One Up Mushroom. For this you will once again use the green nail polish. Starting at the left side of where the white tip ends start making a half oval.
It should look like the picture above. Next step is to fill it in with the green polish. You also want to curve it on a little on the white part like shown in the picture below.

Now using the cardstock and the white polish again we are going to place a dot of product on it.                                                 
Using the bobbypin (or whatever dotting tool you are using) dip it in the white polish and make 5 dots in the green half oval. One should be in the center close to the base. The following two are placed to the left and to the right of the initial center dot. The next two are right above the first row of dots but in between the dots. Use the picture below for referance.


We are almost done! Now taking the black polish we are going to make 2 eyes right next to the green and centered. I am using Kiss Nail Art Paint. Your results should look like the following picture.
The final step is to apply a top coat to the nail so it protects your nail art. I used Sally Hansen, Hard as Nails UV Top Coat.

Finally done! The nails should look super cute and fun! It may take a little bit of pratice but the final result is amazing! I hope you guys enjoy this nail art!!!


Price List:
*Kiss Nail Art Paint (it is a pack with 3 different colors) $6.97 (drugstore)
*Sally Hansen Manicure Kit (the kit comes with a white polish, a pink, and uv top coat that was used too) $5.48 (drugstore
*Sally Hansen Nailgrowth-about $5-$6 (drugstore)

Monday, May 9, 2011

Drug Store Dupes!

So while on Tumblr ( which you can follow me at by clicking here :)) I found a link that shares a lot of dupes for high end brands. I thought this was pretty cool and I want to share it with you guys. It is a super long list and is prety amazing. Enjoy :D 

My Daily Skin Care Routine!


So I am really starting to get back into this whole blogging thing that today I decided to do a blog of product that I use on a daily basis for my skin. I am super excited to share this! I guess I should start by telling you a little bit about my skin. My skin is nowhere near being perfect or where I want it to be. I have combination skin that is acne prone. I really really dislike it! However I cannot change my skin but I can take care of it to make it appear and be in a lot better condition. So lets get started! (P.S. Prices and locations where you can find these products will be a the very bottom of the page.)

MORNING:
Every morning I wash my face. Whether it is in the shower or if I showered the night before I simply wash it. For my face wash I am currently using Cliniques Liquid Facial Soap in mild. Remember, Clinique has a skin line designed for different skin types. The mild formulation is perfect for combination skin. 
 
I must say that I really enjoy this liquid soap. It leaves my skin feeling super soft and not oily or dry at all. It has a very pleasant smell so you dont have to worry about that.  I do use this in combination of my Clarisonic.  
  
I know that the Clarisonic is expensive but a great dupe for it is the Olay Professional Pro X Advanced Cleaning System.

                                             
They both works just amazing! This product in combination with my Clinique face wash help get deep down in my pores and remove any traces left from my makeup and cleanse my face. I have seen some of the reviews from people saying that it made them break out and what not but you must remember that in order to keep your face healthy it must get worse at first. The breaking out is caused from all the bacteria and debris getting taken out of your pores. So dont freak out!  I usually use the Clarisonic in the morning and at night for a full 1 minutes 20 seconds.It is waterproof so I do use it in the shower to cleanse my face, so its very convenient. I make sure to focus on my problem areas such as my nose and cheeks and I also use it on my neck. 

Next I apply a toner to my face to help close the pores and remove any other debris left behind. For this I am truly enjoying my Origins Balancing Tonic in United State. 
                                                       
This 5 fl oz bottle has lasted me for almost 3 months! You do not need to drench a cotton ball or a cotton round with the product, because trust me, a little of this goes a long way. Make sure to apply it all over your face. Let it dry for a good 3 to 5 minutes. This toner is designed for combination skin and is super gentle. It doesn't sting or strip your skin and it smooths out and rough skin. It smells amazing! It has spearmint and lavender as well as bergamot. 

Next step is moisturizing and eye treatment! Now I am only 21 and have started using anti-aging product because I made a bet with my mom that I would be 50 and look young and fabulous. Plus its never too early to start thinking about using anti-aging products. For my eyes I have been using Boscia Enlivening Amino-AG Eye Treatment.


 This eye treatment is designed to hydrate the skin from the inside so it can improve and prevent the signs of aging. A few key ingredients this product has is Coix seed & vitamin E (which together help reduce puffiness and diminish dark circles), willowherb helps accelerate cell renewal and smooth the appearance of fine lines. The biggest plus is that this product is a natural product made without parabens, sulfates, synthetic fragrance, synthetic dyes, phthalates, GMOs, and triclosan. Apply a small amount (usually half a pump or a full pump for both eyes) around your eye with your ring finger. Gently pat it in. I have been using this for almost 4 months and it is very hydrating and feels amazing and cooling under the eye. I have noticed dark circles look a lot fainter and my eye puffiness, due to hardly getting sleep and stress, less noticeable. This product is perfect for all skin types.By the way, is my first bottle purchased and its only .5 oz, so a little of this baby goes a long way!

For my moisturizer I use another anti-aging product. I am so going to win my mother in this bet :D. I use Bliss The Youth As We Know It Anti-Aging Moisturize Cream. 
I love love love this moisturizing cream! It is super hydrating and doesn't leave the skin feeling oily, sticky, or super shiny. I feel it does a very good job at keeping my skin super moisturized and looking healthy. It is more on the price side but I think it is worth every cent. It is made without synthetic dyes, petrochemicals, phthalates, and triclosan. Like I said before I love this product and it will work well for many skin types, although I am not too sure about oily skin since this is a very very hydrating product. I let my moisturizer penetrate my skin for 30 minutes and then proceed to my daily foundation routine. ( I have already done a blog for my daily foundation routine.)

NIGHT:
Now my daily night routine involves removing my makeup and cleansing my face. To remove my eye makeup I am currently using Sephora Collection Instant Eye Makeup Remover. 
This product works great and make it super easy to remove any tough makeup. If you use waterproof Sephora Collection also has a eye makeup remover for waterproof makeup that works well too. It does leave the skin feeling soft but often I feel like it makes my eyes feel all oily and super shiny. So if you guys have suggestions on a eye makeup remover that doesn't leave them feeling oily let me know. I want to try something new! Overall it does work well. 

To remove the rest of my face makeup I like to use Neutorgena Makeup Remover Wipes.


These wipes are super gentle and remove makeup with ease. It has a very pleasant clean and fresh scent to it and they are super soft. My husband even uses these to clean his face whenever he works on the cars and gets oils spots on him. I love love love these wipes! I would recommend these to everyone and they do work on all skin types. 

Once my make up is completely removed I go into the morning skin care routine and head to bed. I hope this helps a little on how to start your own routine and what products that I have tried I have stuck to because of how good they work and of course the ones that I am not a big fan of. I will be trying new products and will works on finding great dupes for some of these or alternatives and will post those soon too. Stay happy and gorgeous :)!

Price List:
*Clinique Face Wash: $16 (Sephora)
*Clarisonic in  Classic: $149-$225 (Sephora or Clarisonic)
*Olay Professional Pro X Advanced Cleaning System: $29.99 or $39.99 depending on just purchasing the brush itself or with the cleanser. (Costco & Drug Stores)
*Origins Balancing Tonic in United State: $19.50 (Origins & Macys)
*Boscia Enlivening Amino-AG Eye Treatment: $38 (Sephora)
*Bliss The Youth As We Know It Anti-Aging Moisturizer: $79 (Sephora)
*Sephora Collection Instant Eye Makeup Remover: $5-$8.50 depends on size you want (Sephora)
*Neutorgena Makeup Remover Wipes: $5-$7, although I got mine at Costco, 114 towelettes for around $16-$20 and it was so worth it! (Drug Stores or Costco)

Sunday, May 8, 2011

Borghese Professional Select Brush Review

Our hearts are drunk with a beauty our eyes could never see.  ~George W. Russell

So I recently went to my local Costco in search of a Mothers Day gift. While on my search for her perfect gift I found a brush set. Now I was amazed with the price and the amazing quality appearance of the brush set ( it was wrapped and so I couldnt really touch the brushes to verify that they were really good quality and well didnt just look like it.).

The picture above is all but one of the brushes that come in the kit. I have to say that the appearance of the brushes are acutally very good quality and after I opened the box the brushes felt very good and well are very good quality brushes for a very reasonable price!

Getting more into the kit itself, the kit comes with 10 brushes total. 6 of these brushes are Premium-Grade Natural Bristles and 4 are Premium-Grade Synthetic Bristles. The Borghese set also come with a nice faux leather brush bag. All this for the very affordable price of $23.99!!!
Now I want to start with the brush case. It is a faux leather case in a gorgeous dark brown color. The case is designed to fit 9 of the 10 brushes. It has a 2 magnets on both ends of the case so you can close it and open it with ease. I must say I really love the look and feel of the case.
(names listed below in order of display in the picture above)

These 3 brushes are the face brushes. There is #101 Angeled Contour Brush (natural bristles), #104 Round Foundation Brush (synthetic bristles), and  #102 Duo-Fiber Blending Brush (synthetic bristles). Like I said before all the brushes are soft to the touch and feel amazing on the skin. Brush #102 is my favorite brush for foundation. #104 foundation brush is really small and I honestly prefer to use it to contour. Finally # 101 brush I use for blush. It helps me apply blush easily and of course if needed to contour as well.

(names listed below in order of display in the picture above)

These next 3 brushes are #200 Eye Powder Fluff Brush (natural bristles), #203 Domed Smudge Brush (natural bristles), and #202 Angled Eye Contour Brush (natural brisles). Starting with #200 this brush makes blending easy to do. It is very fluffy and stiff enough to get the job done. I will say it is larger then most of my blending brushes but it does seem to cut down my blending time. I would so recommend this for blending very bright colors versus blending lighter and softer colors. I would  be afraid of over blending and then making my eyeshadow looking like one big huge mess. Now #203 is a great dense and well packed smudge brush. I will be honest and say I havent really used the brush at all. It is small and dense enough to get the job done. I will have to try it out and let you guys know how well it worked. I just decided to do an initial reaction review for this one. Fianlly #200 a thick fluffy contour brush. This angled brush is much larger then my other contouring angled brushes. It makes it easier and quicker to apply products to the eye crease and kind of blends it in at the same time.


(Following review for the 3 brushes on the right, my camera wouldnt upload the picture at all)
(names listed below in order of display in the picture above)

Next three brushes are #204 Angled Eye/Brow Brush (synthetic bristles), #201 Eyeshadow Brush (natural bristles), and #105 Concealer Brush (synthetic bristles). Starting with #204 this brush is a great multi use brush. You can use it for eyeliner, filling in your eyebrows, and even lining your waterline with powder and gel liner ( more info on this trick to come). It is soft yet stiff enough to get the job done and not hurt you at all. #201 is a large fluffy eyeshadow brush. This brush is great for larger eyes to apply or even pack on eyeshadow. Like I said it is a large brush so I wouldnt recommend this for people with smaller eyes that want to do some detailed work. #105 brush to me doenst really seem like a concealer brush. I use it more to pack on pure pigment eyeshadow. For that use it does an amazing job.

Finally brush #100 Powder Kabuki Brush (natural bristles). This brush is my all time favorite! This brush is not only soft but it is very fluffy and stiff. When I refer to stiff to this brush I dont mean its overly hard. Its hard enough to pick up the product and apply setting powder or any type of powder just amazingly. The other kabuki brush that I have is super soft too but it spreads out when I try to get product on it and the handle is super small (its a tokidoki kabuki) although I love this brush it is sometimes super difficult, specially when I am in a hurry, so brush #100 is my new favorite.

All these brushes provided in the kit are absolutely amazing and I highly recomnmend it. They are available at Costco and if you dont have a membership its ok! You can order them online for a little bit more money. Hope this review helps!