BLOGGER TEMPLATES AND TWITTER BACKGROUNDS

Showing posts with label manicure. Show all posts

Thursday, September 22, 2011

My Makeup and Nail Polish Storage Ideas & Inexpensive Alternatives

"Beneath the makeup and behind the smile I am just a girl who wishes for the world." ~Marilyn Monroe


If you are anything like me you love to purchase new makeup and nail polishes and well it gets to the point where you have no more space to put them in or have no idea how to organize them so it is much more simple to find them. Well thanks to my wonderful husband my organizing and storage problem have been fixed. Well at least for now, because I know my collection will continue to grow and grow. Pictures are posted as well to give a visual of how I am storing my stuff. 

Does it look familiar? If you have any man in your household I am pretty sure you have seen them store nuts, bolts, nails, and other small items in this bin. Well this bin works perfectly for storing and organizing makeup and more! It comes with 40 slots and at the very bottom it has a full length drawer. The price for this particular storage container is very cheap and reasonable. My husband purchased this from Harbor Freight Tools for less than the sale price (he works there and gets employee discounts).

I have my eyeliners, travel size items, extra makeup I have, concealers, and even earrings stored in it. Not only is this keeping all my makeup organized but it is taking up less space in our bedroom. I have a specific way of keeping my stuff organized. I started off with my earrings. I hardly buy earrings that dangle and when I do I am kind of stumped on how to keep them stored, specially if they are feather earrings. So the top 5 slots have dangling earrings in them. I made sure to keep the backs of the earrings sticking out so they would not tangle or ruin an earring. 


The next couple of rows are used for my lip glosses, lip balms and lipsticks. The lip glosses I decided to put together by color. Color coding them makes it easy for me to find what I am looking for. The lipsticks are together by brands. I tried doing it by color as well but found that they would not fit so brand was easiest. I make sure the label with the name of the lipstick is facing outward so that I can see what I am looking for easier. 


Next are face product which include extra foundations, primers, travel size face products, and concealers. These are organized by category. Primers are first, followed by foundation, then concealers. Pretty much how I apply my makeup daily. 


Eye products are next. My primers, e.l.f. quads, M.A.C. eyeshadows, and false lashes are all in the same row. I like to have small eyeshadows or individual ones in the slots because it makes it easier for me to find. Eyelashes are something I hardly use but when I do I like it to be easy to find them.  


Finally eyeliners. I have them color coded as well and separated into categories. Pencils are together by color and liquids and gels are together by color as well. 

In the bottom drawer I have my fingernail tools, lash glue, and loose pigments. Once again makes it super easy for me to find what I am looking for.


Now onto the nail polishes. The container above was initially meant to be for my polishes. However, keeping my polishes on their side causes the polish to leak into the cap which then makes it impossible to open. So I had some empty woven baskets from the dollar store laying around. I had initially purchased these to use for gifts for my business but since I never did use them I decided to use them for my polishes. Once again all my polishes are color coded. I love the baskets because not only were they inexpensive, they are colorful, fit about 20 polishes (depending on width of ea/one), and they are small. 


Now for very inexpensive storage containers that you can use are shoe boxes. Shoe boxes can store your polishes and makeup. They are very inexpensive and you are also recycling. They also help you save space because you  can stack them up on each other. You can decorate the box to look a lot more presentable and neat and even add a cute label so that finding that specific product can be easier. All you need is some fabric, ribbon, markers, or even stickers. You can make it your own style and save space and money while doing so. 

Hope this helps out. Storing cosmetics should be easy, fun, and inexpensive so I hope this really helps out with that. Hope you guys have a fabulous day!!!!



Wednesday, May 25, 2011

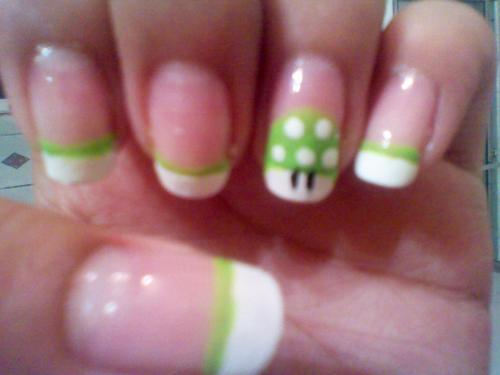
Super Mario One UP Nails!

"Imperfection is beauty, madness is genius and it's better to be absolutely ridiculous than absolutely boring."  ~Marilyn Monroe


So lately I have been super obsessed with Super Mario! I don't know why but I love that game so much I actually went out and bought a Nintendo (the original one. For those wondering why...well we own a X Box 360 and unfortunately they do not make Mario games for it...yet!).  Not to mention it was a steal because it was only $40 with all the cables, 2 controllers, the Super Mario game with Duck Hunt and of course the gun! Any who I decided that to match my passion for this awesome game and my ringtone, notification ringtone, cell wallpaper, and the "Nintendo Addict" T-shirt my husband bought me I would do something  similar for my nails! 
So here is the finished result! It took quite a bit of practice but the final result was amazing and they look super cute! Totally matching my Super Mario passion.  So lets get started on the supplies you need and how to achieve this simple and cute Mario nail look :) (as usual purchase location and prices  for the products I used will be posted at the end)

Supplies Needed:
  • Dotting tool(it can be a toothpick, bobby pin, or actual dotting tool)
  • Base Coat
  • White nail polish
  • Black nail polish
  • Green nail polish
  • Top Coat
  • If you do not have the black and green in the art pens or art polishes(the skinny tubes with super skinny brush) you may need a skinny art brush or a toothpick
  • Tape
  • Piece or cardboard or card stock (to put polish on so you can dip your dotting tool in)
Instructions:
First make sure your nails are squared off. This look works best on squared nails, but if you do not want to its ok, it will still work. For the first step you should appy a base coat. A base coat helps the nail polish adhere better, last longer, and keeps your nail from turning yellow. I personally like to use Sally Hansen Nailgrowth Miracle. I have used this since I was 16 and love how it keeps my nails strong and helps them grow a bit faster. Base coats tend to dry fast. I believe this one dries within seconds so its a good thing.

Once you have applied the base coat to your nails grab the tape and make 2 to 3 tape strips. The tape is going to allow you to make a nice sharp straight line for the french tip. You dont need 10 strips of tape since it is reusable and will it will save you tape too. I believe I used 1 piece of tape for 3 nails and it still would have worked for 3 more.

Once you put the tape on go in with the white fingernail polish and fill in the tip. I am using Sally Hansen, Hard as Nails French White Tip polish (this came in a 3 piece kit for french manicures).
Let it dry for a while and remove the tape carefully. You may need to free hand and fill in the corners or even out the line (I suck at straight lines with anything, yet I can cut straight lines in hair...its kind of funny!).

Repeat this step on every single nail. If needed take a q-tip and dip it in some nail polish remover and clean up the straight line.

Next step is for all the nails EXCEPT the ring finger on both hands. Using the green polish remover to create a straight thin line right underneath the end of the white tip. I used Kiss Nail Art Paint. If you do not have this but do have a green polish use the tip of a toothpick or a bobbypin to make this line. Just put a dot of product on the cardboard or card stock and dip your toothpick or bobbypin in and make the line. The final result should look like the picture at the very top of this post. For some reason my computer did not like the picture and wouldnt upload it...lol.

Now onto making the One Up Mushroom. For this you will once again use the green nail polish. Starting at the left side of where the white tip ends start making a half oval.
It should look like the picture above. Next step is to fill it in with the green polish. You also want to curve it on a little on the white part like shown in the picture below.

Now using the cardstock and the white polish again we are going to place a dot of product on it.                                                 
Using the bobbypin (or whatever dotting tool you are using) dip it in the white polish and make 5 dots in the green half oval. One should be in the center close to the base. The following two are placed to the left and to the right of the initial center dot. The next two are right above the first row of dots but in between the dots. Use the picture below for referance.


We are almost done! Now taking the black polish we are going to make 2 eyes right next to the green and centered. I am using Kiss Nail Art Paint. Your results should look like the following picture.
The final step is to apply a top coat to the nail so it protects your nail art. I used Sally Hansen, Hard as Nails UV Top Coat.

Finally done! The nails should look super cute and fun! It may take a little bit of pratice but the final result is amazing! I hope you guys enjoy this nail art!!!


Price List:
*Kiss Nail Art Paint (it is a pack with 3 different colors) $6.97 (drugstore)
*Sally Hansen Manicure Kit (the kit comes with a white polish, a pink, and uv top coat that was used too) $5.48 (drugstore
*Sally Hansen Nailgrowth-about $5-$6 (drugstore)