BLOGGER TEMPLATES AND TWITTER BACKGROUNDS

Showing posts with label fun. Show all posts

Friday, August 12, 2011

Golden Goddess Look

"When you reach the heart of life you shall find beauty in all things, even in the eyes that are blind to beauty." ~Kahlil Gibran


By now I think we all know that one of the summers biggest trends is the bronze golden look. It is fun, subtle, and flatters any skin tone. There are many variations on how to create your own golden look and I finally decided to go for it and do my take on it and here it is!


I know the lighting sucks but you can still see what my finished product is. It is very simple to create this look and it can be done using gold and brown eyeshadows you already have or spending less than $10 to buy a quad that is nothing but gold and brown colors. It is a perfect look for a night out with friends, a date night, or just for work. If you want to learn how I did this look and what I used keep on reading :)

PRODUCTS USED:

FACE:
*Laura Mercier Oil free Face Primer (Sephora)
*Benefit Cosmetics The POREfessional Primer (Sephora or Ulta)
*MAC Studio Sculpt Concealer (MAC)
*Lancome EFFACERNES Waterproof Protective Under Eye Concealer in Medium Bisque (Sephora)
*MAC Mineralize Skinfinish Natural (MAC)
*Laura Mercier Bronzing Pressed Powder in Golden Bronze (Sephora)
*e.l.f. Mineral Blush in Rose (e.l.f. and local Target)
*e.l.f. High Definition Powder (e.l.f. and local Target)

EYES:
*Urban Decay Primer Potion (Sephora or Ulta)
*Almay Intense I-Color Powder Shadow Trio for Brown Eyes (Ulta or any drugstores)
*Cover Girl Eye Inhancers 3 Kit Shadows in Golden Sunset (Ulta or any drugstores)
*Flirt! Cosmetics Dream Eyes Eyeshadow in Solid Gold (Flirt! Cosmetics or Kohls)
*MUFE Aqua Liner in #7 (Sephora)
*Urban Decay 24/7 Glide-On Eye Pencil in Zero (Sephora or Ulta)
*Benefit Cosmetics Browzing in Dark Brown (Sephora or Ulta)
*MAC Zoom Fast Black Lash (MAC)

LIPS:
*MAC Lustre Lipstick in Sweetie (MAC)
*e.l.f. Luscious Liquid Lipstick in Baby Lips (e.l.f. & Local Target)

HOW TO ACHIEVE THE LOOK:
Once you have put on your foundation, bronzer, and blush apply your eye primer. I used the Urban Decay Primer Potion.
Next use the first (and lightest) color in the Almay Color Trio and apply over the entire eye. This works as your highlight and base color. 
Next we are going to use Flirt! Cosmetics eyeshadow in Solid Gold. Using the sponge tip applicator provided with it or a small eyeshadow brush apply this color over the eyelid. I only like to use the sponge tip applicators when I want to pack on a color and this is defiantly one you want to pack on.
Now using the Cover Girl trio in Golden Sunset use the dark brown color for the crease. This color is not a very pigmented or strong color so you may want to go over it more than once. 

It should look a little like the picture above. Now because I wanted to add some color I went in with my MUFE Aqua Liner in #7. #7 is a very deep violet color with shimmer. Perfect for summer time and the added bonus is its waterproof! I also lined my water line with Urban Decay 24/7 Liner in Zero, this is of course optional. Finally I put on mascara.
Excuse the messy hair (this was taken before I flat ironed my hair (was waiting for it to completely air dry)).This is the end result. I hope you guys like this look. Like I mentioned before it is very simple but also a versatile look. 


**Coming Next will be an Ulta Cosmetics Haul and review...maybe some different looks using the products.

Wednesday, May 25, 2011

Super Mario One UP Nails!

"Imperfection is beauty, madness is genius and it's better to be absolutely ridiculous than absolutely boring."  ~Marilyn Monroe


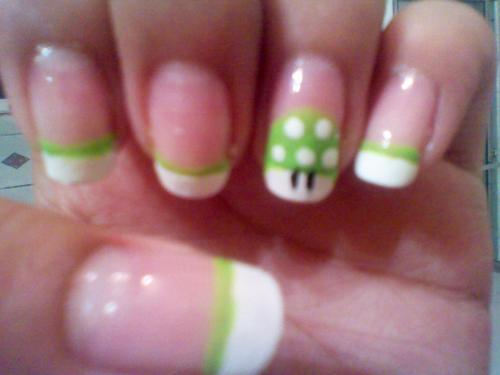
So lately I have been super obsessed with Super Mario! I don't know why but I love that game so much I actually went out and bought a Nintendo (the original one. For those wondering why...well we own a X Box 360 and unfortunately they do not make Mario games for it...yet!).  Not to mention it was a steal because it was only $40 with all the cables, 2 controllers, the Super Mario game with Duck Hunt and of course the gun! Any who I decided that to match my passion for this awesome game and my ringtone, notification ringtone, cell wallpaper, and the "Nintendo Addict" T-shirt my husband bought me I would do something  similar for my nails! 
So here is the finished result! It took quite a bit of practice but the final result was amazing and they look super cute! Totally matching my Super Mario passion.  So lets get started on the supplies you need and how to achieve this simple and cute Mario nail look :) (as usual purchase location and prices  for the products I used will be posted at the end)

Supplies Needed:
  • Dotting tool(it can be a toothpick, bobby pin, or actual dotting tool)
  • Base Coat
  • White nail polish
  • Black nail polish
  • Green nail polish
  • Top Coat
  • If you do not have the black and green in the art pens or art polishes(the skinny tubes with super skinny brush) you may need a skinny art brush or a toothpick
  • Tape
  • Piece or cardboard or card stock (to put polish on so you can dip your dotting tool in)
Instructions:
First make sure your nails are squared off. This look works best on squared nails, but if you do not want to its ok, it will still work. For the first step you should appy a base coat. A base coat helps the nail polish adhere better, last longer, and keeps your nail from turning yellow. I personally like to use Sally Hansen Nailgrowth Miracle. I have used this since I was 16 and love how it keeps my nails strong and helps them grow a bit faster. Base coats tend to dry fast. I believe this one dries within seconds so its a good thing.

Once you have applied the base coat to your nails grab the tape and make 2 to 3 tape strips. The tape is going to allow you to make a nice sharp straight line for the french tip. You dont need 10 strips of tape since it is reusable and will it will save you tape too. I believe I used 1 piece of tape for 3 nails and it still would have worked for 3 more.

Once you put the tape on go in with the white fingernail polish and fill in the tip. I am using Sally Hansen, Hard as Nails French White Tip polish (this came in a 3 piece kit for french manicures).
Let it dry for a while and remove the tape carefully. You may need to free hand and fill in the corners or even out the line (I suck at straight lines with anything, yet I can cut straight lines in hair...its kind of funny!).

Repeat this step on every single nail. If needed take a q-tip and dip it in some nail polish remover and clean up the straight line.

Next step is for all the nails EXCEPT the ring finger on both hands. Using the green polish remover to create a straight thin line right underneath the end of the white tip. I used Kiss Nail Art Paint. If you do not have this but do have a green polish use the tip of a toothpick or a bobbypin to make this line. Just put a dot of product on the cardboard or card stock and dip your toothpick or bobbypin in and make the line. The final result should look like the picture at the very top of this post. For some reason my computer did not like the picture and wouldnt upload it...lol.

Now onto making the One Up Mushroom. For this you will once again use the green nail polish. Starting at the left side of where the white tip ends start making a half oval.
It should look like the picture above. Next step is to fill it in with the green polish. You also want to curve it on a little on the white part like shown in the picture below.

Now using the cardstock and the white polish again we are going to place a dot of product on it.                                                 
Using the bobbypin (or whatever dotting tool you are using) dip it in the white polish and make 5 dots in the green half oval. One should be in the center close to the base. The following two are placed to the left and to the right of the initial center dot. The next two are right above the first row of dots but in between the dots. Use the picture below for referance.


We are almost done! Now taking the black polish we are going to make 2 eyes right next to the green and centered. I am using Kiss Nail Art Paint. Your results should look like the following picture.
The final step is to apply a top coat to the nail so it protects your nail art. I used Sally Hansen, Hard as Nails UV Top Coat.

Finally done! The nails should look super cute and fun! It may take a little bit of pratice but the final result is amazing! I hope you guys enjoy this nail art!!!


Price List:
*Kiss Nail Art Paint (it is a pack with 3 different colors) $6.97 (drugstore)
*Sally Hansen Manicure Kit (the kit comes with a white polish, a pink, and uv top coat that was used too) $5.48 (drugstore
*Sally Hansen Nailgrowth-about $5-$6 (drugstore)

Wednesday, February 2, 2011

Cotton Candy Anyone?

Beauty is the promise of happiness.  ~Stendhal


I am a big Katy Perry fan and as a fan I was super excited to find out she is coming  to IDAHO! Omg! I was jumping up and down with excitement and just had to get my hands on a couple of her tickets. Thankfully I was able to get tickets and cant express how lucky and excited I am to have the opportunity to see her in concert! Any who this got me thinking and I decided to do a look inspired by the light up cotton candy she will be having at her concert. If you have twitter and follow her she announced the light up cotton candy.  Any who, this look is inspired by her concert and the light up cotton candy she will be having there! EEEK! Super excited!


P.S. Sorry the lighting sucks in my pictures, took them in a hurry with my cell but I promise lighting will improve.


So I took this picture a few hours after doing the look and well I was also at work...lol. But It was pretty simple and I really liked the fact that it was different and not my normal makeup routine. 

What I used: (Most products will be Urban Decay :D)
First off to prime my eye I used my all time favorite primer, the Urban Decay Primer Potion. A little bit of that primer goes a long way. As as base color I used Sell Out, which is a shimmery pink champagne tone. I applied that over my entire eyelid and up to my brow bone. On my lid I started off with Minx, which is a teal with silver glitters in it. Make sure to pack on the teal color, specially in the inner half of the eyelid. On the outer corner of the eye I applied AC/DC, which is a dark shimmery purple with small blue glitters. Like I mentioned before make sure to pack it on. So far you should have teal in the inner half of your eyelid and the purple on the outer half of the eyelid (I know cotton candy is pink or blue but the purple was a little more brighter then pink). The next step is to blend, blend, blend. Blend until the colors seems to follow into the other. Use circular motions to get the harsh line dividing the colors to look like they gradually change from teal to purple. However,  try not to blend too much because then you will not be able to tell the difference in color and it may look like a muddy color.  To make the look come together apply the same colors on your lower lash line mimicking the makeup on the eyelid. Therefore the inner lower lash line should be teal and the outter half should be purple. Over lap the purple onto the teal so it blends in. For eyeliner I used a black eyeliner. My eyeliner is Benefits BADGal Liner in Black. Just line the upper lash line to make your eyes look a bit bigger, more awake, and open. To make your eyes pop even more I went in and applied Aspen Summit Number 23, which is a shimmery silver white color, in the inner corner on my eye as well as my highlight for my brow bone. This makes your eyes look a little whiter and not only catches light but draws attention to you eyes. Finally for mascara I used Zoom Lash mascara in Zoom Black. I wanted my eyelashes to have more volume and fullness to them as well as a dramatic affect. 

It is an easy and fun look. For the complete and finished look use bronzer or a soft peach color on your cheeks to give you that pop of color and for lips do a soft pink or just gloss. Hope you enjoy it and once again, if you want me to review any specific products or do a specific tutorial let me know. I love feedback!

Prices of Products Used and Where to find them:
  • Urban Decay Primer Potion (Sephora) $18
  • Urban Decay Eye Shadow in Sell Out shadow (Sephora) $17
  • Urban Decay Eyes Shadow in Minx shadow (Sephora) $17 for an individual or $34 for the Vegan Palette.
  • Urban Decay Eye Shadow in AC/DC (Sephora)-It was in the Book of Shadows Vol II but great substitutes for it are: Urban Decay Stardust Eye Shadow in Retrograde-$20 or Sephora Collection Mono Eye Shadow in Cardines Pride Number 33-$12
  • Sephora Collection Mono Shadow in Aspen Summit Number 23 (Sephora) $12
  • Benefit Cosmetics BADGal Liner in Black (Sephora) $20
  • Zoom Lash in Zoom Black (MAC) $14